Showing posts with label mother/daughter project. Show all posts

Monday, August 26, 2019

Stitch Swatch Sampler Swatch 15: Solid Shell Stitch


SWATCH 15:  SOLID SHELL STITCH


The Shell Stitch is a staple stitch in crochet.  It creates a unique pattern and texture in the fabric.


Ch 15 (multiple of 6, plus 3)
Row 1:  Sc in 3rd st from hook and in each st across.  Turn.  13 sts.
Row 2:  Ch 1, sc in first st, [sk 2 sts, 5 dc (=shell) in next st, sk 2 sts, sc in next st] 2 times.  Turn.
Row 3:  Ch 3, 2 dc in same st as ch, sk 2 sts, sc in next st, sk 2 sts, shell in next st, end sk 2 sts, sc in next st, sk 2 sts, 3 dc in last st.  Turn.
Rep Rows 2-3 twice more.

Last Row:  Ch 1, sc in first st, (hdc in next st, dc in next 3 sts,  hdc in next st, sc in next st) 2 times.  Break off.

AbbreviationsCh  Chain  sc  single crochet  st(s)  stitch(es)  sk  skip  dc  double crochet  
                           Rep  repeat  hdc  half double crochet

Solid Shell Stitch Pro Tips:

  • I have added an "evening" row at the top to counter the wavy nature of this stitch.  If you choose to use this stitch for another project where a straight edge is not essential, you may want to omit the last row.


Wednesday, August 14, 2019

Stitch Swatch Sampler Swatch 14: Crunch Stitch


SWATCH 14:  CRUNCH STITCH

This stitch has a pleasing overall “mountain-peak”  texture, and a reversible nature.  It uses a combination of half double crochet and slip stitch, alternating across each row.
Crunch Stitch
Ch 16 (multiple of 2, plus 2 turning chains)
Row 1 (Border Row):  Sc in 3rd ch and in each st across row.  Turn work.  14 sts.
Row 2:  Ch 2 (counts as hdc), sl st in second st, *hdc in next st, sl st in next st. Rep from * across                       row.  Turn work.

Rep Row 2 until piece measures 3 3/4 inches.
Last Row (Border Row):  Ch 1, sc in each st across.

Abbreviations:  Ch  Chain  sc  single crochet  st(s)  stitch(es)  hdc half double crochet  sl st  slip stitch               Rep  repeat

Crunch Stitch Pro Tips:
  • ·         Note that, starting with Row 2, each row has a peaked look (See photo, below).  Between the peaks, there are valleys that look like a little “V”.  The tops of the stitches form the sides of the “V”.  When you work this stitch, except for the border rows, you will always be working s sl st into the right side of the “V”, where the stitch slants down to the left (red arrow in second photo), and a hdc into the left side, where the stitch slants up to the left (blue arrow).  See photo, below.
  • ·         You will be working into the tops of the stitches of the last row, which form a chain going from left to right, slightly to the back of the fabric
  • ·         As for some of the other stitches we have explored, turn the work to the back, not like you would the page of a book.
  • ·         You can work this swatch without the border rows if you prefer…but the top and bottom edges may be wavy.  If you like this effect, go for it!


Crunch Stitch in progress
Where to work the sl st (red arrow) and the hdc (blue arrow)


Thursday, February 28, 2019

Stitch Swatch Sampler Swatch 13: Herringbone Half Double Crochet

SWATCH 13:  HERRINGBONE HALF DOUBLE CROCHET


Herringbone Half Double Crochet


 This stitch will add an interesting texture to your finished project.  You may find it a bit fiddly to do, but the texture it creates just may be worth it.  Give it a try and see!  It is created similarly to the half double crochet, but instead of working a yarn over, drawing a loop through the stitch, and then drawing a new loop through the remaining stitches on the hook, the loop that has been drawn up in the stitch is drawn through the first loop on the stitch, then a new loop is drawn through the remaining 2 loops.  See instructions below.

Ch 14 (multiple of 1, plus 2 turning chains)
Row 1:  HBhdc in 4th ch  and in each st across row.  Turn work.  12 sts.
Row 2:  Ch 2 (counts as st), HBhdc in next st and in each st across row.  Turn work.
Rep Row 2 until piece measures 4 inches.

To work the Herringbone Half  Double Crochet:  Yo, draw up loop in st, immediately draw loop through first loop on hook, yo and draw through last 2 loops on hook.

Abbreviations:  Ch  chain  HBhdc  Herringbone half double crochet  st  stitch  Rep  repeat  
                           yo  yarn over

Herringbone Half  Double Crochet Pro Tips:

·              When turning the work, turn the right edge of the swatch to the back, then to the left.  This seems to create a smoother edge on almost every stitch I have tried.
·                Note that, unlike most other stitches we have done, you do not yo after drawing the loop through the stitch of the previous row.  Just draw that same loop through the first of the two loops on the hook, then yo and draw through the two remaining loops.
·                 Experiment with the position of your hook as you draw it through the stitch and the first loop on the hook.  It may be possible to find just the right position to do this in one fluid swoop; otherwise, draw through the stitch and the loop on the hook in separate motions.  I find that turning the hook so the opening faces the previous stitch is the most advantageous position.

s

Monday, February 18, 2019

Stitch Swatch Sampler Swatch 12: Half Double Crochet


SWATCH 12:  HALF DOUBLE CROCHET

Swatch 12:  Half Double Crochet


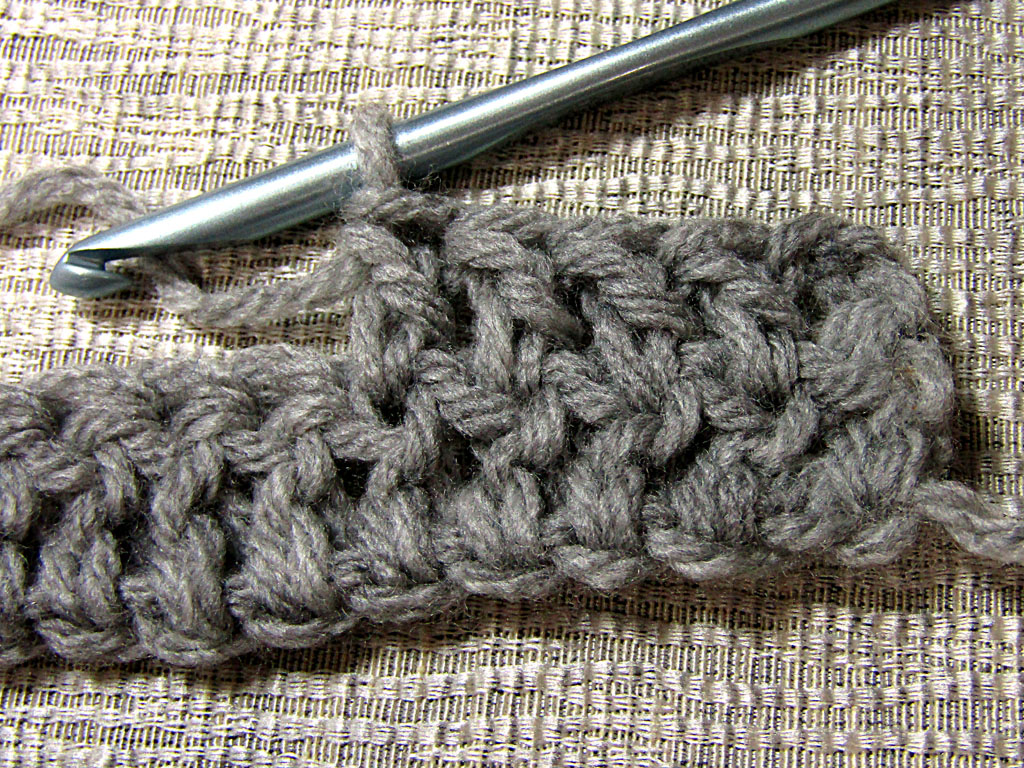
Half double crochet can be a little trickier to work than the other stitches, because you are drawing your loop through more loops on the hook as you work it.  But if this stitch is new to you, you will find that you will develop a “feel” for it, and it will become comfortable with practice.

To work a half double crochet:  Yo hook, insert hook into next st, draw up loop in st, yo and draw through all 3 loops on hook.
Ch 15 (multiple of 1, plus 2 turning chains)
Row 1:  Hdc in 4th ch  and in each st across row.  Turn work.
Row 2:  Ch 2 (counts as st), hdc in next st and in each st across row.  13 sts.  Turn work.
Rep Row 2 until piece measures 4 inches (My swatch has 10 rows).  Break off; weave in ends.

Abbreviations:  ch  chain  dc   st(s)  stitch(es)   hdc  half double crochet  Rep  repeat   yo  yarn over hook

Half Double Crochet Pro Tips:
  • ·         When drawing the hook through 3 loops, make sure the open part of the hook is facing down (toward the starting chain), not toward you.  This will allow the hook to slide through all 3 loops more easily, without catching on them.
  • ·         When turning work, bring the right side of the work to the back, then to the left instead of turning the work as though you were turning a page in a book.  This just makes a nicer edge in my opinion…try it and see which you like better.
  • ·         Be sure to work your last stitch of the row into the turning chain, not into the top of a stitch.  This will create a smoother selvedge edge.


Wednesday, January 9, 2019

Stitch Swatch Sampler Swatch 11: Step Stitch


SWATCH 11:  STEP STITCH

This stitch uses front and back post dc’s to create a diagonal step design in the fabric.


Ch 16 (Multiple of 6 plus 2, plus 2 turning chains)
Row 1:  Dc in 4th ch from hook and in each ch across.  Turn.
Row 2:  Ch 2, (fpdc in next 3 sts, bpdc in next 3 sts) twice, hdc in top of turning ch.
Row 3:  Ch 2, (fpdc in next 2 sts, bpdc in next 3 sts, fpdc in next st) twice, hdc in top of turning ch.  Turn.
Row 4:  Ch 2, (bpdc in next 2 sts, fpdc in next 3 sts, bpdc in next st) twice, hdc in top of turning ch.  Turn.
Row 5:  Ch 2, (bpdc in  next 3 sts, fpdc in next 3 sts) twice, hdc in top of turning ch.  Turn.
Row 6:  Ch 2, (fpdc in next st, bpdc in next 3 sts, fpdc in next 2 sts) twice, hdc in top of turning ch.  Turn.
Row 7:  Ch 2, (bpdc in next st, fpdc in next 3 sts, bpdc in next 2 sts) twice, hdc in top of turning ch.  Turn.
Row 8:  Rep Row 2.
Row 9:  Rep Row 3.  Break off; weave in ends.

Abbreviations:  ch  chain  dc  double crochet  fpdc  front post double crochet  bpdc  back post double crochet  st(s)  stitch(es)  pdc  post double crochet  hdc  half double crochet  Rep  repeat  yo  yarn over hook

To work a hdc:  Yo hook, insert into st, yo and draw loop through st, yo and draw through all 3 loops.

Step Stitch Pro Tips:
  • ·       Note that the stitch pattern has groups of 3 fpdc’s and 3 bpdc’s for the body of the fabric.  The only place this is different is at the edges, where the diagonal lines come up against the straight selvedge edge.  So after you have worked any partial groups (1 or 2 pdc’s) at the right edge, you can happily work along in groups of 3 until you get close to the left edge.  My instructions were written to make the swatch easy to work; but if you are working a larger fabric, it may be easier to think in terms of the 3 pdc groups.
  • ·       These instructions could be alternatively written using asterisks, instead of the repeated parentheses sections.  If they were written that way, Row 3 might have been written as follows: 
          Ch 2, fpdc in next 2 sts, *bpdc in next 3 sts, fpdc in next 3 sts.  Rep from * across, ending 
          bpdc in next 3 sts, fpdc in next st, hdc in last st.  This way of writing the instructions shows the 
          3-pdc repeat really well, but would have been awkward, as there would only have been one
          repeat.
  • ·         See Swatch 10 instructions for how to work fpdc and bpdc sts.


Saturday, January 5, 2019

Stitch Swatch Sampler Swatch 10: Basket Weave Stitch


SWATCH 10:  BASKET WEAVE STITCH

This stitch pattern uses post stitches (which are worked around the shaft of the stitch of the row below, instead of into its “head”) to create a ribbed effect.  The fabric is very textural, and creates a woven look.  See Pro Tips for instructions on how to do the fpdc and bpdc.


Basket Weave Stitch

Chain 16 (multiple of 4 plus 2, plus 2 turning chains).

Row 1:  Dc in 4th ch from hook and in each ch across.  14 sts.
Row 2:  Ch 2 (counts as 1 st), fpdc around post of next st of row below, (bpdc over next 2 sts, fpdc over next 2 sts) 3 times.   Turn work.
Row 3:  Rep Row 2.
Row 4:  Ch 2, bpdc over next st, (fpdc over next 2 sts,  bpdc over next 2 sts) 3 times.  Turn work.
Row 5:  Rep Row 4.
Row 6:  Rep Row 2.
Row 7:  Rep Row 2.
Row 8:  Rep Row 4.
Row 9:  Rep Row 4.

At end of Row 9, break off.  Weave in ends.

Basket Weave Stitch Pro Tips:
  • ·         To work a fpdc:  Yo hook; insert the hook from the front, behind the shaft or post of the stitch from right to left and out at the front.  Yo and draw a loop behind the post and back to the front again; this takes the place of drawing up a loop in the stitch of the row below.  (Yo and draw through 2 loops) twice.
Insert hook under shaft of st from front
Yo hook, draw loop around shaft of st


(Yo and draw through 2 loops) twice...the completed fpdc 
  • ·         To work a bpdc:  Yo hook; starting from back of work, insert hook around the shaft or post of the st of the previous row from back, to front, and to the back again; yo and draw this loop back to the back of the work, (yo and draw through 2 loops) twice.

Insert hook around shaft of st from back
Yo hook, draw loop around shaft of st
(Yo, draw through 2 loops) twice...the completed bpdc

  •  ·         This stitch can be a little confusing to work.  Keep in mind that each time you work a row a second time ( in our swatch, this would be rows 3, 5, 7 and 9), you will be working your post stitches opposite to the way they were worked on the row below.  This is because you are working on the opposite side of the fabric.  So on these rows, you will work a fpdc over each bpdc, and a bpdc over each fpdc.  In other words, you will work one row (rows 2, 4, 6 and 8) working fpdc’s over fpdc’s, and bpdc’s over bpdc’s, and the next row working fpdc’s over bpdc’s, and bpdc’s over fpdc’s.


Abbreviations:  ch  chain  dc  double crochet  st(s)  stitch(es)  fpdc  front post double crochet
                           bpdc  back post dc  rep  repeat  yo  yarn over

Friday, December 7, 2018

Stitch Swatch Sampler Swatch 9: Slip Stitch Rib


SWATCH 9:  SLIP STITCH RIB


This is an amazing stitch pattern.  It forms a fabric that, when turned  90 degrees, resembles a knitted ribbing, both in appearance and resilient stretchiness.  

Slip Stitch Rib Swatch, turned 90 degrees
Once you practice a bit, I think you will love it!  It is much more rib-like than single crochet in the back loop.  If you choose to use this as a rib at the edge of a sweater or cap, you will need to crochet it from side to side of the garment…that’s just the way this stitch works.

The stretch of this rib
Ch 17 (multiple of 1, +2 turning chains)
Row 1:  Sl st in 3rd ch from hook and in each ch across row.  15 sts.  Turn work.
Row 2:  Ch 1, sl st in BL of each st across row.  Turn work.

Rep Row 2 until your piece measures 4 inches.  Break off and weave in ends.

Abbreviations:  Ch  chain  sl st  slip stitch  st  stitch  BL  back loop  Rep  repeat


To work a sl st, insert the hook into the next st, yo hook, and draw through the st, then immediately through the loop on the hook.


Slip Stitch Rib Pro Tips:
  •  Turn the right edge of the work to the back, then to the left at the end of each row.  It might seem more natural to turn the work as if the fabric were the page of a book, but I find turning it this way creates a nicer edge.  Try it both ways, and see which you prefer.
  •  Instead of inserting the hook into the back loop of the last stitch, insert it under the front loop and the diagonal loop at the edge of the work (see photos).
  •  Be sure to not work your slip stitches too tightly.  Aim for a consistent, even tension.

  • Insert hook under the strand marked in red, then under the strand marked in blue
    Hook inserted under horizontal strand
    
Hook inserted under diagonal strand at edge.  Note that the hook tip comes out to the side, rather than to the back of the work.

Saturday, November 24, 2018

Stitch Swatch Sampler Swatch 8: Checkerboard Stitch

SWATCH 8:  CHECKERBOARD STITCH

Checkerboard Stitch
Ch 14 (multiple of 4, plus 2 turning chains)

Row 1:  Sc in 3rd ch from hook and in each st across.  12 sts.  Turn.
Row 2:  Ch 1, sc in first 2 sts, dc in next 2 sts.  *Sc in next 2 sts, dc in next 2 sts.  Rep from * across row.

Rep Row 2 nine times more, until you have 10 rows total. 

Last row:  Ch 1, sc in each st across row.  Break off.

Checkerboard Stitch Pro Tips:
  • ·         As for single crochet, work the last stitch into the turning chain instead of the last stitch; this will give a more straight, even edge.  In general, use single crochet pro tips.
  • ·         Note that normally you will be working a sc into a dc or a dc into a sc when working this stitch pattern.
  • ·         If you have trouble getting the correct gauge on this stitch pattern, use whatever hook size will give you the stitch gauge (12 sts=4”).  Adjust the row gauge by working more or less rows (making sure your first and last rows are in plain sc).  If it helps, you could work two sc rows at each end instead of one…whatever works.


Stitch Swatch Sampler Swatch 7: Up and Down Stitch

SWATCH 7:  UP AND DOWN STITCH

Up and Down Stitch

Ch 14 (Multiple of 2, + 2 turning chs)
Row 1:  Sc in 3rd ch and in each st across.  Turn.  12 sts.
Row 2:  Ch 1, sc in first st, (dc in next st, sc in next st) 5 times, sc in last st.  Turn.

Rep Row 2 until you have 11 rows, then rep Row 1.  Break off.

Abbreviations:  ch  chain  sc  single crochet  st  stitch  dc  double crochet  rep  repeat

Up and Down Pro Tips:
  • ·         As for single crochet, work the last stitch into the turning chain instead of the last stitch; this will give a more straight, even edge.  In general, use single crochet pro tips.
  • ·         Note that normally you will be working a sc into a dc or a dc into a sc when working this stitch pattern.
  • ·         It may help to chant, “Single, double” over and over again as you do this stitch pattern.  If there are people around, you have my permission to just think it.
  • ·         If you have trouble getting the correct gauge on this stitch pattern, use whatever hook size will give you the stitch gauge (12 sts=4”).  Adjust the row gauge by working more or less rows (making sure your first and last rows are in plain sc).  If it helps, you could work two sc rows at each end instead of one…whatever works.


Saturday, October 27, 2018

Stitch Swatch Sampler Swatch 6: Double Crochet

SWATCH 6:  DOUBLE CROCHET

Double Crochet Swatch


(Note:  I had to use a size H hook to get the correct gauge on this square.)
Ch 15 (Multiple of 1 + 2 turning chains)

Row 1:  Dc in 4th ch from hook (counts as a st) and in each ch across.  Turn.  13 sts. 
Row 2:  Ch 3 (see Double Crochet Pro Tips), dc in next st and in each st across.  Turn.

Rep Row 2 until you have a total of 7 rows, or until swatch measures 4 inches high.

Abbreviations:           Ch  chain       dc   double crochet        st    stitch      Rep   repeat

Double Crochet Pro Tips:
  • ·         I find that two turning chains work better for me at the beginning of a dc row than 3.  It makes a straighter, smoother edge for me.  Try it and see if it works better for you!

  •       As for single crochet, I prefer the look of the edge if I turn the work so the right edge goes to the back, rather than turning the work like the page of a book.  Again, see which you like best.

  • ·         If you want each double crochet to be perfectly aligned with the dc below it, try this.  Insert your hook under 3 strands at the top of the dc, not just under the top 2.  Look at the dc you are working into.  Below the top two strands, there is a more or less horizontal strand at the front of the work.  It forms a sort of sideways “V” (opening to the left) with the front strand at the top of the stitch.  

Insert hook under top 2 strands and strand marked with red dot


Completed dc 
Dc stitches lined up neatly
       If you insert your hook under all 3 of these strands, when you draw the loop through the stitch, your stitch will rise up out of the center of the stitch below it, not slightly to the side of it.  This works well for techniques like Filet Crochet, where you want the stitches to line up accurately.  Note that if you are working in the round, the opposite side of the stitch will be facing you, so that horizontal strand will lie at the back.  If you are working into the back loop of a round of dc, you can insert your hook into the back 2 loops only and create a more solid join at the base of your stitch.

Can you see a difference between my original swatch (left) and the one made using my Double Crochet Pro Tips?

Excerpted from Crochet Basics by Rebecca Harmon


Double Crochet

Make a chain.  Rotate the hook counter-clockwise so that the yarn wraps around the shaft once.  Insert the hook into the fourth chain from the hook (see Fig. DC-1), catch the yarn on the hook and pull through the chain stitch.  There are now 3 loops on the hook.  Wind the yarn over the hook again (this is called yarn over and is abbreviated yo), and pull through 2 loops.  Yo hook again, and pull through the last 2 loops on the hook.  You have just completed one double crochet stitch.
Fig. DC-1
For the next double crochet stitch (dc), yo hook, insert the hook in the next chain to the left, yo and pull through the chain, yo, pull through 2 loops, yo, pull through 2 loops.  Continue in this manner across the row, working one dc into each chain stitch. 


Row 2:  At end of row 1, chain 3; turn work as you would the page of a book.  Yo hook, insert hook under top 2 strands of next stitch, yo hook, pull through stitch, yo hook, pull through 2 loops, yo hook, pull through 2 loops.  Work a dc in each stitch cross row.

Note:  Unless directed otherwise in a specific pattern, insert the hook under both loops of each stitch.

Monday, October 22, 2018

Stitch Swatch Sampler Swatches 4 and 5: Single Crochet in Back and Front Loop


I didn't get last week's swatch post up, so I decided to include it with this week's post.  The two stitches are related...each involves inserting the hook into only one strand of the stitch of the previous row.  If you haven't done this before, start your swatch; after the first row, look at the tops of the stitches of the row you have just completed.  At the top of each stitch are two strands that look like a sideways "V".  When crocheting into the back loop, always insert your hook under the back strand, the one farthest from you, and when crocheting into the front loop, insert it under the front strand, the one closest to you.  Do this the same way on every row to work these patterns.

SWATCH 4:  SINGLE CROCHET IN BACK LOOP


This stitch creates a ridged effect, somewhat like knitted rib.  It is often used for ribbed edgings on sweaters.  Usually it is crocheted from side to side of the garment, so the ribs are oriented vertically.

Ch 15 (Multiple of 1 + 2 turning chains)
Row 1:  Sc in 3rd ch from hook and in next 12 chs.  13 sts.  Turn work.
Row 2:  Ch 1; sc in BL of each st across.  Turn work.
Rep Row 2  13 times more, until you have 15 rows total.

Abbreviations:  Ch(s)  Chain(s)     sc  single crochet    BL  back loop     st  stitch     Rep  repeat

See Single Crochet Pro Tips in Single Crochet Swatch instructions.

SWATCH 5:  SINGLE CROCHET IN FRONT LOOP


This stitch surprised me!  I had assumed that crocheting in the front loop on every row would create the exact same effect as crocheting in the back loop, but I was wrong…the fabric is totally different.  Single crochet in the back loop creates a very textured ridged fabric…a kind of corrugated effect.  Single crochet in the front loop creates a smooth, flat fabric with horizontal lines.  Quite a pretty look, but not at all what I was expecting!

Ch 15 (Multiple of 1 + 2 turning chains)
Row 1:  Sc in 3rd ch from hook and in next 12 chs.  13 sts.  Turn work.
Row 2:  Ch 1; sc in FL of each st across.  Turn work.
Rep Row 2  10 times more, until you have 12 rows total.

See Single Crochet Pro Tips in Single Crochet Swatch instructions.