Showing posts with label designing. Show all posts

Wednesday, June 6, 2018

The Evolution of a Design

Sometimes it is good to just do something new and different.  I have been focusing on my new knitted Double Garter Stripes technique a lot over the past couple of years, and I recently had a yen to make a crocheted shawl.  I wanted to do something special, but I wasn't quite sure what.  I turned to Pinterest for inspiration.  In a search on Crocheted Shawls, I happened upon a design called the Virus Shawl (quite a name, eh?) that apparently has been going viral (hence the name??) in crochet circles.  What attracted me to the shawl was its graceful shells and the rich interplay of colors I saw in some of the made-up shawls.  I began to dream about a shawl with rich Renaissance or Baroque colors, crisp texture, and flowing pattern.

I decided that a yarn with a slight sheen and long, flowing color segments would work best for this design, something like Lion Brand Landscapes or Red Heart Unforgettable that would have longer color sections but still allow a dramatic color change from one row to the next.

I began to play with some worsted weight yarn from my stash, exploring ideas for working the pattern of the shawl.  I was fairly pleased with the initial results, so I purchased 6 balls of Lion Brand Landscapes in the Rain Forest colorway, and began work on the actual shawl.  As I worked, the pattern began to solidify a bit, and to morph slightly.  My original intent had been to make a roughly crescent-shaped shawl with lacy shells, openwork with tall treble stitches, and picots for richness and texture.  But as I crocheted, I decided to focus more on the shells and picots, and move away from the treble lace.  This allowed the colors to interact more vividly together.  The overall effect caused the outer edge of the shawl to be a little bit ruffled.  I haven't decided if I like the ruffled effect or not...I like the idea of the fullness at the outer edges of the shawl, but I am not quite sure I like the way the finished shawl drapes.  I may need to try it in a thinner, more drapey yarn such as Red Heart Unforgettable.

I ended up buying one more ball of the Landscapes to complete the edging on the shawl.

Here is the finished shawl.  What do you think?


Here are a couple of photos that show the rich texture, color, and pattern of the shawl.


Yes, that is a red ribbon from the county fair.  I was a bit disappointed that it didn't win a blue!  But as I was photographing it, I noticed a 3/4" yarn tail sticking out on the wrong side of the shawl that I had neglected to clip during the finishing process.  Oh, well...you can't win them all.

I haven't completely solidified the design for this shawl yet.  I need to play with it more, to work out the kinks in the pattern and to make the design more cohesive.  But I am very pleased with the initial result.  I need to get more colorful, shiny yarn!

Thursday, December 7, 2017

Miss Ellen's Mount Hood Doorstop


When my friend Ellen heard me describe the Sea Stone Paperweights I've been making from special stones I pick up along the beach, she knew she had to commission me to make one for her.  But the thing was, what she really wanted was a doorstop...something larger that would hold a door open or closed.

Ellen has been collecting special stones for many years now, so she had quite a few to choose from.
She had planned to find one on an upcoming trip, but when that trip became impossible because of some health concerns, she decided to find one from her collection.

She called one day, excited to tell me about the stone she had found.  She said she calls it her "Mt. Hood Doorstop" because it is shaped like a mountain, with a point on the top.  She had certain colors she wanted, to match her decor...white, and gray, and mauve.  She was afraid the sharp edge on the rock might be a problem, and we discussed the possibility of covering the point at the top with crochet, so it wouldn't be too sharp.  There were also some sharp edges on the side and bottom of the piece, as well.

As we brainstormed the doorstop design, I began to get an image in my mind of what this creation could look like.  We both began to get excited as we imagined our creation!  I suggested that I could do the white top at the peak resembling snow, and then do some of the gray in an openwork pattern so the rock could show through.  I asked her if she would mind if I used some forest green along the lower flanks of the mountain, and she suggested that maybe I could use the mauve to represent flowers sprinkled through the forest.  Later she called me back and asked if I could make some white parts that would flow down like glaciers...I had already planned to do that.

I was very excited when her husband dropped by soon after with the rock and some color swatches.

The front face of the rock

The back face of the rock
A couple of the colors I had in my stash of crochet thread, but the others proved to be elusive.  Apparently there is not much call for mauve crochet thread these days!  But I managed to collect the  colors I needed.
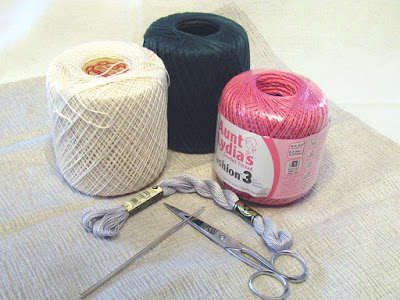
The tools and materials for the doorstop

I had asked my husband if we had anything that could smooth the sharp edges on the stone, and he said no.  He suggested emery cloth, but I didn't know where I could get some.  One day, as I was running my finger along the rough edges of the stone, I got an idea.  Would an emery board work?  I had a few around, and tried one.  It smoothed the sharp edges of the stone into a fine dust, without marring the flat surfaces of the rock.  Praise the Lord!  Problem solved.

I was now able to begin crocheting the cover for the rock.  My plan was simple (or so I thought).  I would make the "snowy top" first, then do most of the lacy gray openwork part, then crochet the bottom green and mauve part, and last I would use the gray to connect the top and bottom parts.

I began with the white, making a relatively amorphous cone for the top of the mountain.  I wanted some "glaciers" that would come farther down the mountain than others.

The "snow" for the top of the mountain
When this was completed, I tried it on.  It looked ok.


Next, I worked on the openwork with the gray thread.


At first, I just worked a network around the white edges, but I didn't like the corners that this formed in the white thread.  I ripped it out, and worked a round of sc in gray around all the white edges, then worked the network again.  This looked much better.

Now, I was ready to work the most difficult part of the doorstop...the green bottom part.  This was difficult because the rock was such a complex shape.  I decided to work a flat piece for the bottom that would more or less match the shape of the bottom of the rock.

Comparing the flat bottom to the bottom of the rock
When I had the flat part more or less matching the shape of the rock bottom, I worked a round of crochet all around it and began working upward in rounds.  I had decided to use a shell stitch for the sides of the forest, and intersperse pink bobbles among them for the flowers.  After I had worked several rounds of this, I tried it on the rock.


It was a bit loose...especially at the top, where the rock was rapidly decreasing in size.


I tried the top on, too...just to get an idea of how they would fit together.  I decided I would need to decrease several times on the edge where the stitch marker is, to make it fit better.  I ended up ripping back the gray part, and redoing parts of it, before working the joining round.


 Here is the finished product.  I wish the green part was a little less wonky, but overall I am pleased with the results.  I might just have to look for more mountain-shaped rocks!  I think Miss Ellen will love it.
 The back side of the mountain is not quite so neat and tidy, because of its uneven shape.

Side view
Opposite side view

Looking at the side views shows how wonky the shape really was...this is what made it complicated to fit the crochet to the rock.

Here are a couple more photos of the mountain, because I had so much fun taking them!


When my daughter saw the photos I had taken, she suggested that I do some with blue sky as the background, so it would really look like a mountain.  So here are a couple shots.


P.S.  This doorstop is a Christmas present for Miss Ellen...let's keep the photos to ourselves until Christmas!

Friday, September 12, 2014

Variety is the Spice of Life

I recently published a new pattern.  It took quite a long while to get the pattern written up, for a couple of reasons.  First of all, the yarn I had made the original prototype from (a couple years ago) had been discontinued.  Secondly, I wanted to include several sizes in the instructions, and wanted to actually knit them up and make sure they worked.  And thirdly, I had made a number of similar tams which were variations on the theme, and wanted to include these ideas as possible variations for the pattern. 

This particular tam was inspired by some beautiful, bright, rainbow-colored yarn with long color repeats.  The tam is constructed using kite-shaped wedges for the top, and I thought it would be fun to make a tam in which each wedge would be a different color of the rainbow.  I tried it with Bernat Mosaic yarn, and it worked pretty well.
The tam was colorful...really colorful.  I knitted the body of the tam, then worked a section of ribbing with a couple rows of bobbles.  It looked pretty spectacular, if I do say so myself.
But when I found out the yarn had been discontinued, I had to find something else.  I settled on

Red Heart Boutique Unforgettable, which not only had a long color repeat, but also a lovely sheen.  I loved the Dragonfly colorway, and quickly worked a tam up.  It worked!
The yarn fairly glowed.  And the bobble rows turned out different colors, just like in the other tam.


I made tams in a couple of other colorways, and then faced a new decision.  I had made a very similar tam in this modular technique, using two colors of yarn.  Should I include the directions for this as a variation to my pattern?  Or should I publish it separately, on its own?


I got some yarn in two colors (solid colors this time), and tried working up the new pattern in two colors.  I figured that I could write it up as a variation to the pattern.  I did this, but called it by a different name (The Zigzag Tam) to distinguish it from the original (The Victoria Tam).

 I began thinking about other possible variations.  The tam could be made in just one color, for a textured effect, or in two colors with one for the tam top and one for the body.
 And what about using a variegated yarn with a shorter repeat?
 Finally, I remembered that I had made a modular tam several years ago in which each kite-shaped motif was a different color.  So I included that as well, for inspiration.
After making multiple tams in several sizes and variations, I finally got the pattern completed.  And here it is...Ta Da!!  It's available on Craftsy, Ravelry and in my Etsy shop.
http://www.craftsy.com/pattern/knitting/accessory/the-victoria-tam/112073
http://www.ravelry.com/patterns/library/the-victoria-tam
https://www.etsy.com/listing/202953589/the-victoria-tam-digital-download?ref=shop_home_active_5


Thursday, April 10, 2014

The Story Behind the Diamonds Twined Knitted Cap


Some years back, I acquired the book Twined Knitting: A Swedish Folkcraft Technique, by Birgitta Dandanell and Ulla Danielsson and translated into English by Robin Orm Hansen.  I was intrigued by the rich texture of the mitten-in-progress on the cover, and wanted to see how this technique was done.  I love learning new techniques, and applying them to my own knitting.  So as I read through this book and swatched some of the stitches, I dreamed of a hat in my own design in this technique. 


Twined knitting is a fascinating technique, which uses two strands of yarn (generally both ends of a center-pull ball) alternately throughout the knitting, which is typically done in the round.  To knit each new stitch, one must let go of the yarn used for the last stitch, and pick up the yarn from the stitch before it, bringing it over the yarn last used (for a knit stitch), or under the yarn last used (for a purl stitch).  This twists, or twines, the yarns  together on the back of the fabric, for a knit row, or on the front of the fabric, for a purl row.  The fabric created is somewhat thicker and firmer than a regular knitted fabric.

Knit diamond with Chain Path
Purl diamond with Chain Path


The twined knit stitch creates a smooth surface on the front of the fabric, while the twined purl stitch creates a horizontal ridged texture.  But the real fun (and rich texture) begins when one works a Crook Stitch.  A Crook Stitch contains three or more stitches with the two yarns held on opposite sides of the fabric.  When working Crook Stiches, the front yarn stays at the front and works only purl stitches, and the back yarn stays at the back and works only knit stitches.  For example, many patterns are worked with three-stitch groups, as follows:  p1 with the front yarn, k1 with the back yarn (leaving the purled yarn at the front of the work), p1 with the front yarn.  The front yarn is returned to the back of the work and the twined knit stitch is resumed until the next crook stitch is to be worked.  On the next row of the Crook Stitch pattern, the same three stitches would be worked as follows:  Bring the yarn to be purled to the front of the work,  k1 with the back yarn, p1 with the front yarn, k1 with the back yarn, then bring the front yarn to the back of the work.  This creates an O-shaped design on the front surface of the fabric, formed by the strands between the purl stitches, and it contrasts beautifully with the smooth surface of the twined knit stitch. 

A Column of Crook Stitch "O's"
Crook Stitch Diamond Pattern


If you work two entire rounds of crook stitches, keeping the purl yarn always at the front and the knit yarn always at the back, and working k1, p1 around on one round and p1, k1 around on the next, you will have a Chain Path.  Working several repeats of this Chain Path pattern creates a honeycomb-like pattern (see the backgrounds of the diamond patterns above).

I decided to use both Crook Stitches and Chain Paths in my cap design.  I used some lovely, buttery-soft yarn from Cascade Yarns, Cash Vero, to create my prototype cap.  The cap turned out beautifully, and I was very pleased with it.  I submitted a photo of this cap to the book 1000 Fabulous Knit Hats, and it ended up being used in the book, along with some of my other hat photos.  The cap was a hit with my local customers, and the original prototype soon sold.

The Original Twined Knitted Cap in Cash Vero

After a couple of people had inquired if the cap pattern was available, I decided to write up the pattern for publication.  After all, it was one of my favorites.  I went to order more of the yarn, and found that it had been discontinued.  I asked Cascade if they had anything similar, but the options they suggested somehow didn't seem quite right.  I finally decided to use their Alpaca Lana D'Oro, which is a soft and warm alpaca/wool blend, but a little thinner than the Cash Vero.

Using my notes from the original prototype (which were not complete, but did contain charts of the pattern elements from the original cap), I was able to knit another cap using the same number of stitches.  The cap seemed just a little bit small for an average sized head (Truthfully, the original was a bit on the small side, too).  I upped the needle size from a 7 to an 8, which made the cap slightly less dense and a little larger.  I also decided to try designing a medium and large size in this pattern.  Since I have not published multiple-size patterns before, this took extra time, as did writing instructions for the techniques needed to knit this cap.  After making a number of these caps in different sizes and yarns, I finally solidified the pattern and got it ready to publish.

So here it is, hot off the press!!  It is available for sale on Craftsy ( http://www.craftsy.com/pattern/knitting/accessory/diamonds-twined-knitted-cap/92443 ), on Ravelry ( http://www.ravelry.com/patterns/library/diamonds-twined-knitted-cap), or in my Etsy shop ( http://www.etsy.com/listing/185156142/pdf-digital-download-pattern-diamonds?ref=shop_home_active_1), whichever is more convenient for you.                                                                                                                                                                                                 

Friday, August 26, 2011

The Predicaments of Pattern Production, or, The Frustrations of Fashioning a Finished Fiber Fabrication

After working all year on the same two patterns, I finally got both of them self-published.  You may wonder why it would take over half a year to get two patterns written up; I am asking myself the same question.

I guess the simple answer to this is modern technology (more specifically, computer programs, and my own ineptitude with them!).  In trying to create a pattern that looked “professional”, I had begun creating knitting charts in Excel, using the Aire River Knitting Font, and pasting them into my Publisher file as I created the pattern.  This works great, but I found earlier this year that when I would make a pdf of the chart, some of the lines on the chart would come out with uneven thickness (See the example below).


 This is not horrible, but it bugged me that when I designed the charts in Excel, they looked fine, but when made into a pdf, they looked different.  This seemed to happen randomly, with different results at different times.  Adding to this problem was the fact that, in order to create the charts the way I wanted them, I needed to paste them into another program to tweak a few things before inserting them into my Publisher file.  This seemed to create even more problems.

It seemed like the three programs I was using didn’t interface very well with each other.  I tried many different ways to save the files and many different ways to insert them, but remained unsatisfied.  But eventually I found that, though my charts didn’t look perfect on the screen, they did seem to print up reasonably well.  So I decided to use the best ones, even though they still irritate me.

Another problem that hindered the production of these two patterns was that I decided to make some changes in the design as I went along.  Each time I made a change, I re-knitted the pattern, to be sure that I had written the instructions clearly and accurately.  This took additional time, effort, and focus.

In the first pattern, the Bavarian Twist Stitch Christmas Stocking,


Bavarian Twist Stitch Christmas Stocking

I decided to use a ribbing for the bottom of the foot, instead of stockinette, after designing and writing up the pattern.  The instructions had to be rewritten, and some of the charts had to be redone, as well.  Then I realized that because the two sides of the sock were mirror images of each other, I needed two separate charts, rather than one repeated chart where the gusset is decreased.  Then I tried creating a pdf file from my Publisher file, and discovered that my charts looked wonky because of the uneven thickness of the lines on the chart!  But I finally got the pattern published.

The second pattern was the Collared Knitted Capelet.

Collared Knitted Capelet

 I had thought this one would be easier to chart than the previous one, because it contains no cables.  But these charts also gave me trouble because of the uneven thickness of the lines.   And I kept finding “hidden” objects in my chart that didn’t show up in Publisher, but jeered at me from my pdf’d chart, saying,  “Catch me if you can!”   To make matters worse, I came up with a “better idea” for the crocheted edging.  This meant that I had to knit the pattern again to try out my idea.  Unfortunately, after re-knitting the garment using my new idea, I discovered that the old way actually looked the best!  But in the process, I had discovered a way to keep the front edges from rolling so much.  So I started knitting again, to check out my pattern description of this technique.

Now that these two patterns are completed, I am breathing a sigh of relief.  I am hoping that my next pattern can be written up with much less trouble.  If only I weren’t such a perfectionist!